samedi 21 avril 2012

Neck Fitting


My particular technique for fitting a neck on a instrument is an adaptation of a baroque or transitional technique. I didn't come up with it, I just chose it (and converted Douglas to it).
It involves having the back of the instrument off while the neck is being fitted and glued. This allows us to have a much greater control of the joint in the block since it is not hidden by the button of the back and allows us to work on the mortice from both directions.
Makers use this technique for cello making but rarely for smaller instruments, whereas I do.

For this job, the front is "spot glued" in place (meaning just at the blocks) so it can be removed easily and the mould is kept inside for stability.


vendredi 20 avril 2012

Fingerboard

On a new instrument, it is rather nice that the fingerboard can be made before the neck is fitted, instead of using that we may call a "false fingerboard".
It does provide a perfect guide for fitting the neck in and it is much quicker made when made that way.

On a cello, the important space between the fingerboard and the front allows us to varnish under the fingerboard without difficulties - which is different on a smaller instrument (therefore would force us to remove the fingerboard for varnishing - which is never a good idea)
Also it allows us to shape the neck with the fingerboard. That provides accuracy and guaranties us that the neck will stay straight and won't warp.

dimanche 1 avril 2012

Bass Bar

Once the Sound Holes are finished, we take a big number of notes about thicknesses of both plates, their weight, we calculate the density of the wood used, we take note of the modal notes (notes on which the plates do vibrate and do not),... Everything is carefully logged so we can use all of it as reference when comparing two of our instruments (or more) of the same model. Victoria's cello is the forth cello of the same model.

Then we can start the making of the bass bar that has both a role of strengthening the front under the bridge bass foot and carrying the sound a bit more across the sound board (the front).
The wood used for it is narrow grain spruce and it is fitted perfectly to come to a specific place inside the soundboard.


It is also fitted slightly offset to the front wood grain as to not create any weakness (therefore cracks) at the seam with the front.
Once glued, the bass bar is given a streamline shape. (This picture shows it just glued and unshaped)


I like gluing my bass bar with restaurer's clamps rather than bass bar pegs as their pressure is from the top and guaranty less distortion and flaws - so does Douglas.


In the process of shaping the bass bar, we dispose of the wood on it that is unnecessary extra weight and doesn't act as support.

mercredi 28 mars 2012

Sound Holes

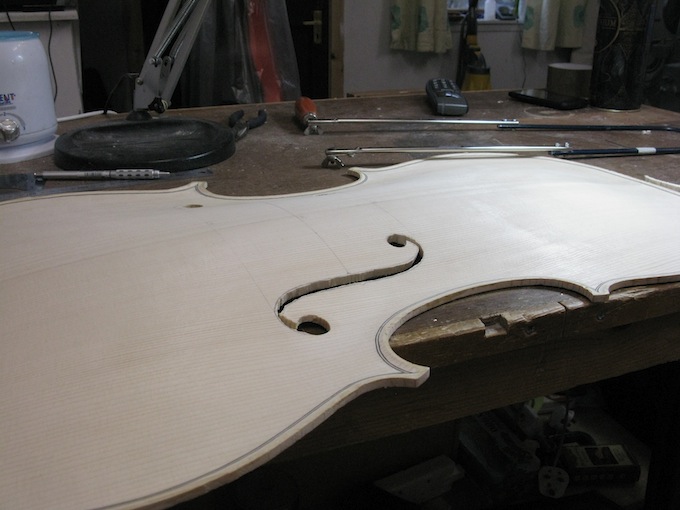
The sound holes have a lot of different roles in the balance of the sound board (the front).
The sound produced in the box (space between the front, the back and the ribs) is being projected via the sound holes (that are commonly called F-Holes because of the F shape of the bass one).
But wood being removed at that particular point is also playing a major hole in the flexibility of the front.
Their shape, the way they are cut, where they are placed, all plays a critical role in the sound.
They also have an esthetical purpose and to emphasize this, there is a slight fluting around the
bottom wing of each sound holes.

Our tool to cut the round holes is called an F-hole cutter. The cutter is around a axle so we have to drill a first hole that can guide the cutter through.
In doing so the angle of the arching has to be respected (we don't drill perpendicular to the ground...)
The rest of the sound hole is cut with a fret saw. The one we use for cellos is a modified one made from two fret saws.

To finish the F-hole we use razor sharp knives and it take a long time and a lot of concentration.
That way way only we can assure ourselves that elegance and harmony is respected between the two.

Hollowing - part 2

 The inside of the plates too, like the outside has to be smooth.
So we use again our Thumb planes and scrappers.

Hollowing the plates - part 1

Once the archings are perfectly finished on both plates, we can start the hollowing.

We use gouges to hollow and a measuring tool called a thicknessing calliper that tells us the exact thickness  of the plate at a particular point - hence the fact that we cannot re-work the top of the plates afterwards. We follow very precise measurements for thicknessing that we have refined with our experience from existing standard measurements.

lundi 26 mars 2012

back purfling knot

This is one of my trade mark. Although (of course !) I didn't come up with such ideas, it is no longer common to see the back purfling tying into a pattern.
I did not do that on my first cello but decided to do it on all the subsequent cellos. I use a new pattern for each cello and I believe that for the longevity of the instrument, taking the purfling away from the heel [of the neck] that is a weaker part of the instrument can be a good precaution. Or maybe that's just my excuse.


For Victoria's cello I kept the design simple.
The process is otherwise the same as the rest of the purfling but it has to be executed on the finished arching.