dimanche 22 avril 2012

Finishing the wood work

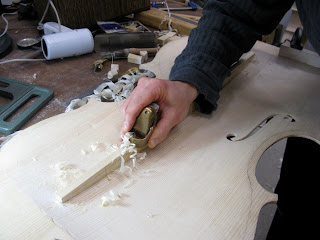
The edge work - rounding around the edges - has been roughly started before the plates were glued to the body so to access easily the underside without damaging the ribs.

It is always the very last job, along with a few chamfers to be finished here and there, before looking at the instrument and thinking: "Et voilà... that's me done..."


samedi 21 avril 2012

Shaping the neck

The "box" is now closed together for good. It takes a long time on a cello to insure that the ribs are set on both plates where there are meant to be - sometimes slight distortions of the ribs change their shape and they are to be "persuaded" back into place. This is the only way to guarantee no loss of overhang - the extra wood on the plates that makes the edges. The regularity of the overhang is purely esthetic, but that is so important.


The neck is now ready to be shaped using rough rasps, files, knifes and going down to the finest grit of sand paper. The neck is polished with micromesh and the grain is raised several times with water in between the sanding.

 We do have measurements for the neck thickness, but what our hands tell us holding the neck is a better guide and the shadows that are created by our bench lamp on the neck will tell us about bumps and irregularities...

Other supports


We find it very important to support parts of the cello so as to lengthen its life and minimise the intervention of restorers in decades to come. This takes even more of our time but we respect our instruments to at least that point of giving them as much longevity as we can.


We support the front and back centre joints with little studs of spruce and maple that are then shaped. (This is common practice).


Once the mould has been taken off we also like to line all the inside of the ribs with japanese paper of the finest grade.
This paper, once glued on becomes one with wood. It is so thin that it is almost unseen and cannot be counted as extra weight. However its fibers going across the grain in every direction provide a support as strong as if another piece of wood was here (like plywood).
This will prevent warping, sinking, and cracks on the ribs.

 The blocks can then be shaped in order to reduce the weight and it is about that time (before the back is glued on) that we place the label - to insure it is exactly at the right place and well secure (again for decades to come).


This cello now has two labels : one saying the names of the makers, the place it was made and the date; the other one explaining who by and why it was commissioned.
All my labels are made and calligraphed by hand using a quill and japanese ink.
I do not pretend to have amazing calligraphy skills but I like to hang on to that bit of fun that I learned when I was in art school.

Neck Fitting


My particular technique for fitting a neck on a instrument is an adaptation of a baroque or transitional technique. I didn't come up with it, I just chose it (and converted Douglas to it).
It involves having the back of the instrument off while the neck is being fitted and glued. This allows us to have a much greater control of the joint in the block since it is not hidden by the button of the back and allows us to work on the mortice from both directions.
Makers use this technique for cello making but rarely for smaller instruments, whereas I do.

For this job, the front is "spot glued" in place (meaning just at the blocks) so it can be removed easily and the mould is kept inside for stability.


vendredi 20 avril 2012

Fingerboard

On a new instrument, it is rather nice that the fingerboard can be made before the neck is fitted, instead of using that we may call a "false fingerboard".
It does provide a perfect guide for fitting the neck in and it is much quicker made when made that way.

On a cello, the important space between the fingerboard and the front allows us to varnish under the fingerboard without difficulties - which is different on a smaller instrument (therefore would force us to remove the fingerboard for varnishing - which is never a good idea)
Also it allows us to shape the neck with the fingerboard. That provides accuracy and guaranties us that the neck will stay straight and won't warp.

dimanche 1 avril 2012

Bass Bar

Once the Sound Holes are finished, we take a big number of notes about thicknesses of both plates, their weight, we calculate the density of the wood used, we take note of the modal notes (notes on which the plates do vibrate and do not),... Everything is carefully logged so we can use all of it as reference when comparing two of our instruments (or more) of the same model. Victoria's cello is the forth cello of the same model.

Then we can start the making of the bass bar that has both a role of strengthening the front under the bridge bass foot and carrying the sound a bit more across the sound board (the front).
The wood used for it is narrow grain spruce and it is fitted perfectly to come to a specific place inside the soundboard.


It is also fitted slightly offset to the front wood grain as to not create any weakness (therefore cracks) at the seam with the front.
Once glued, the bass bar is given a streamline shape. (This picture shows it just glued and unshaped)


I like gluing my bass bar with restaurer's clamps rather than bass bar pegs as their pressure is from the top and guaranty less distortion and flaws - so does Douglas.


In the process of shaping the bass bar, we dispose of the wood on it that is unnecessary extra weight and doesn't act as support.