jeudi 22 novembre 2012

Voilà...

No commentaries.... ;-)


many more pictures of the finished instrument are available on my website : www.mondocellos.co.uk

mardi 21 août 2012

The very last bit of the making of our instruments is what's called the set up - all the free standing and removable parts, some of which can be adjusted to change the sound of the instrument.
This includes the ebony work of the nut and the saddle, the peg fitting, the sound post fitting and the bridge fitting.
I have worked with my father - a retired engineer - for several months to devise a way of making beautiful professional tailpieces for cellos in the wood of my choice.
Victoria's cello is set up with one of them made in olive wood - a landmark of my home, the south of France.
The pegs were made by Philip Brown - a very talented wood turner who specialises in instruments pegs.


We use the best wood for sound post and bridge that means it is made from the best grown tone wood, best processed and worked on the split to insure stability over time.

The Painting

As part of the commission of the cello I have agreed to create a dedication for Victoria, in whose it was made.
I then told them how in awe I was of one my masters, Barack Norman - a english maker of the 18th century who used to hide his initials in intricate decorative purflings.
Inspired by this I designed a pattern, also highly inspired by imperial roman art, to pay tribute to Victoria, in which I included her initials.
I used oil paints which is the easiest to use on oil varnish but I also used some kind of thick acrylic for the gold and the silver.

Varnishing


We all the know that the purpose of the varnish, on wood in general and musical instruments in particular, is to protect it - namely from dirt and changing humidity, but also from stains such as that made by the sweat on hands (and neck in the case of violins and violas).
Whereas traditional guitar making uses french polishing techniques (spirit based varnish), we use oil based varnishes. And because we stay as close as possible to the tradition of our masters, it will never be a question of a gun to apply varnishes.
Our varnish is simply a mix of colophony, mastic and copal and linseed oil (a balanced mix giving enough elasticity to the varnish to let it work and vibrate with the wood and not crack and chip).
It is beautifully transparent as well as golden in colour. We add finely ground lake pigments - always favouring the most transparents ones - to give brown, gold, honey or red shades.

For most of our instruments - including this one - we have used varnish that we have cooked ourselves.
Each coat of varnish is being polished before the next is applied.
There is here only one coat of coloured varnish in between two coats of clear (uncoloured varnish)
Each coat is dried for two days under UV black light.


The wood treatment

It is always a bit strange to come to that point where none of the tools we used for the making are going to be used again for this instrument and a new set of tools and skills will come in.
When we were at school, the art of treating wood and varnishing and that of getting the sound out of the instrument was taught in the second year, when the wood working was the programme of the first year.
The number of techniques to treat and varnish an instrument almost equal the number of makers and restorers itself. It is a very personal skill... And the Secret of Stradivari is yet to be (re) discovered.

I accepted that UV light has a positive effect on my instruments.
Italian Masters use to hang their violins in their secadour, a construction at the top the house roof open to fresh air and day light but offering protection to direct sun light (that would have damaged the glue and distorted the wood)
Our UV cabinet with tanning tubes inside is a much less romantic but as efficient of the secadour.
Our instruments can spend as long as we can in it - the longer the better. I usually do at least 10 days.
In that special case, Douglas put the cello in the UV cabinet and waited for our son Loïc to be born.
He came a week late so by the time Douglas's paternity leave was ending, the cello had been 5 weeks in it. Wonderful.
The UV light tans the wood and gives a lovely buiscuity colour but also dries it out gently and makes the wood produce ozone that will react with other chemicals.
Then comes the Potassium Nitrite which reacts with the ozone created by the UV, darkening the wood a shade further. Next treatment is tea stain and ammonia fuming. The tea stain is only a very very strong tea with a drop of alcohol to kill mould and that applied on the wood gives more colour as the tannins contained in tea react with the ammonia. all of those treatments bring the wood to darken to a nice brown and the figure to come out without damaging the wood.


dimanche 22 avril 2012

Finishing the wood work

The edge work - rounding around the edges - has been roughly started before the plates were glued to the body so to access easily the underside without damaging the ribs.

It is always the very last job, along with a few chamfers to be finished here and there, before looking at the instrument and thinking: "Et voilà... that's me done..."


samedi 21 avril 2012

Shaping the neck

The "box" is now closed together for good. It takes a long time on a cello to insure that the ribs are set on both plates where there are meant to be - sometimes slight distortions of the ribs change their shape and they are to be "persuaded" back into place. This is the only way to guarantee no loss of overhang - the extra wood on the plates that makes the edges. The regularity of the overhang is purely esthetic, but that is so important.


The neck is now ready to be shaped using rough rasps, files, knifes and going down to the finest grit of sand paper. The neck is polished with micromesh and the grain is raised several times with water in between the sanding.

 We do have measurements for the neck thickness, but what our hands tell us holding the neck is a better guide and the shadows that are created by our bench lamp on the neck will tell us about bumps and irregularities...

Other supports


We find it very important to support parts of the cello so as to lengthen its life and minimise the intervention of restorers in decades to come. This takes even more of our time but we respect our instruments to at least that point of giving them as much longevity as we can.


We support the front and back centre joints with little studs of spruce and maple that are then shaped. (This is common practice).


Once the mould has been taken off we also like to line all the inside of the ribs with japanese paper of the finest grade.
This paper, once glued on becomes one with wood. It is so thin that it is almost unseen and cannot be counted as extra weight. However its fibers going across the grain in every direction provide a support as strong as if another piece of wood was here (like plywood).
This will prevent warping, sinking, and cracks on the ribs.

 The blocks can then be shaped in order to reduce the weight and it is about that time (before the back is glued on) that we place the label - to insure it is exactly at the right place and well secure (again for decades to come).


This cello now has two labels : one saying the names of the makers, the place it was made and the date; the other one explaining who by and why it was commissioned.
All my labels are made and calligraphed by hand using a quill and japanese ink.
I do not pretend to have amazing calligraphy skills but I like to hang on to that bit of fun that I learned when I was in art school.

Neck Fitting


My particular technique for fitting a neck on a instrument is an adaptation of a baroque or transitional technique. I didn't come up with it, I just chose it (and converted Douglas to it).
It involves having the back of the instrument off while the neck is being fitted and glued. This allows us to have a much greater control of the joint in the block since it is not hidden by the button of the back and allows us to work on the mortice from both directions.
Makers use this technique for cello making but rarely for smaller instruments, whereas I do.

For this job, the front is "spot glued" in place (meaning just at the blocks) so it can be removed easily and the mould is kept inside for stability.


vendredi 20 avril 2012

Fingerboard

On a new instrument, it is rather nice that the fingerboard can be made before the neck is fitted, instead of using that we may call a "false fingerboard".
It does provide a perfect guide for fitting the neck in and it is much quicker made when made that way.

On a cello, the important space between the fingerboard and the front allows us to varnish under the fingerboard without difficulties - which is different on a smaller instrument (therefore would force us to remove the fingerboard for varnishing - which is never a good idea)
Also it allows us to shape the neck with the fingerboard. That provides accuracy and guaranties us that the neck will stay straight and won't warp.

dimanche 1 avril 2012

Bass Bar

Once the Sound Holes are finished, we take a big number of notes about thicknesses of both plates, their weight, we calculate the density of the wood used, we take note of the modal notes (notes on which the plates do vibrate and do not),... Everything is carefully logged so we can use all of it as reference when comparing two of our instruments (or more) of the same model. Victoria's cello is the forth cello of the same model.

Then we can start the making of the bass bar that has both a role of strengthening the front under the bridge bass foot and carrying the sound a bit more across the sound board (the front).
The wood used for it is narrow grain spruce and it is fitted perfectly to come to a specific place inside the soundboard.


It is also fitted slightly offset to the front wood grain as to not create any weakness (therefore cracks) at the seam with the front.
Once glued, the bass bar is given a streamline shape. (This picture shows it just glued and unshaped)


I like gluing my bass bar with restaurer's clamps rather than bass bar pegs as their pressure is from the top and guaranty less distortion and flaws - so does Douglas.


In the process of shaping the bass bar, we dispose of the wood on it that is unnecessary extra weight and doesn't act as support.

mercredi 28 mars 2012

Sound Holes

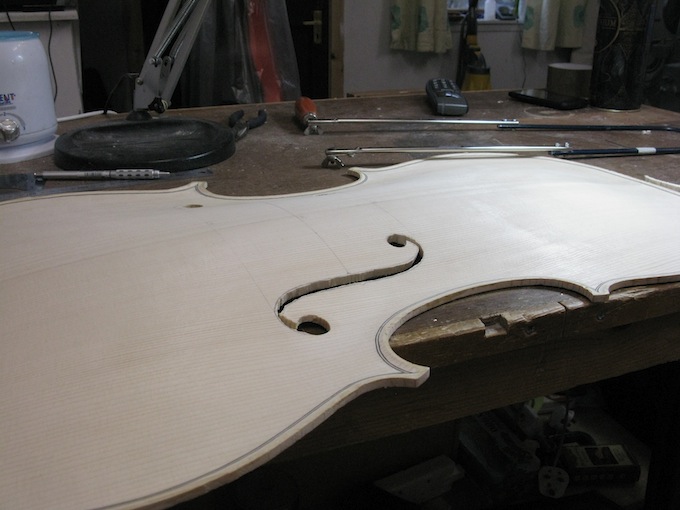
The sound holes have a lot of different roles in the balance of the sound board (the front).
The sound produced in the box (space between the front, the back and the ribs) is being projected via the sound holes (that are commonly called F-Holes because of the F shape of the bass one).
But wood being removed at that particular point is also playing a major hole in the flexibility of the front.
Their shape, the way they are cut, where they are placed, all plays a critical role in the sound.
They also have an esthetical purpose and to emphasize this, there is a slight fluting around the
bottom wing of each sound holes.

Our tool to cut the round holes is called an F-hole cutter. The cutter is around a axle so we have to drill a first hole that can guide the cutter through.
In doing so the angle of the arching has to be respected (we don't drill perpendicular to the ground...)
The rest of the sound hole is cut with a fret saw. The one we use for cellos is a modified one made from two fret saws.

To finish the F-hole we use razor sharp knives and it take a long time and a lot of concentration.
That way way only we can assure ourselves that elegance and harmony is respected between the two.

Hollowing - part 2

 The inside of the plates too, like the outside has to be smooth.
So we use again our Thumb planes and scrappers.

Hollowing the plates - part 1

Once the archings are perfectly finished on both plates, we can start the hollowing.

We use gouges to hollow and a measuring tool called a thicknessing calliper that tells us the exact thickness  of the plate at a particular point - hence the fact that we cannot re-work the top of the plates afterwards. We follow very precise measurements for thicknessing that we have refined with our experience from existing standard measurements.

lundi 26 mars 2012

back purfling knot

This is one of my trade mark. Although (of course !) I didn't come up with such ideas, it is no longer common to see the back purfling tying into a pattern.
I did not do that on my first cello but decided to do it on all the subsequent cellos. I use a new pattern for each cello and I believe that for the longevity of the instrument, taking the purfling away from the heel [of the neck] that is a weaker part of the instrument can be a good precaution. Or maybe that's just my excuse.


For Victoria's cello I kept the design simple.
The process is otherwise the same as the rest of the purfling but it has to be executed on the finished arching.

finishing the archings

Once the purfling is in place and the fluting is finished - that is the narrow hollow running along the outline  and featuring the purfling in its deepest point - we can go back to the arching and make all the shapes flow together.
Gouges are used first and then little planes that we call Thumb Planes. These are often fascinating because of their size.

The scrappers will smooth the surface to a satin finish and a localized use will smooth out the small bumps, flats and hollows that can disturb the elegance of the arching.