lundi 20 février 2012

Cutting out outlines.

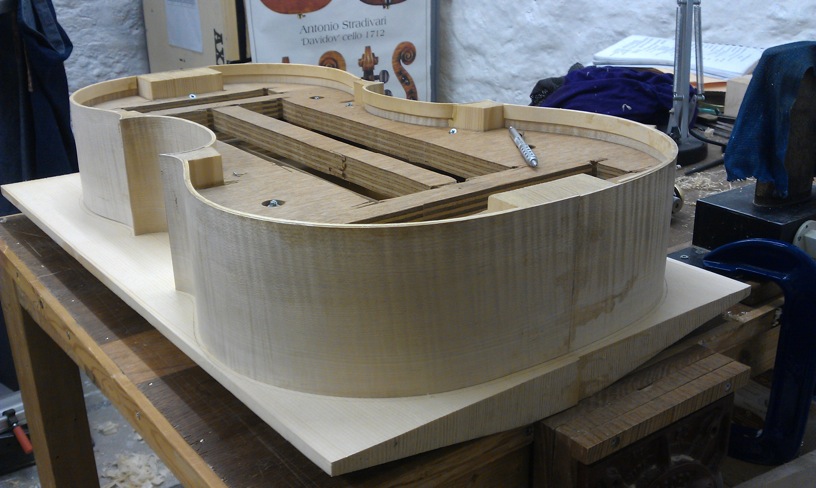
Placing carefully the rib structure on each jointed plate, we first mark around it with a scriber because that will be one of the only references to relocate the plates on the ribs perfectly at the same place. This is crucial for the instrument. We also drill two tiny holes for each plate into the top and bottom blocks and we use pins (called locating pins) to also enable us to accurately relocate the plates on the ribs. Much later on, when we are finished with the pins, the holes will be bushed. Such tiny holes can be seen on most classical instruments.
After that we use a special tool (a washer actually :-) to draw the outline at a set distance from the ribs.

However the corners are drawn by eye and by hand. The style is mine and belongs just to me.
It can take me hours to come to the point I am happy with all my corners fitting in with the rest of my outline (which is also my creation from some years back).


Both plates are cut out carefully, using a band saw - of course.
On this picture, you can see that a bit is missing into the bottom boot at the edge. It is not uncommon that a piece of wood is slightly to short to accommodate the whole outline. In this case a piece will be glued on and the addition will be almost invisible and totally safe. This is called a wing.
In the history of Violin Making some instruments, for that reason or another (sometimes to discard a bad bit in the wood without discarding the whole piece) have been pretty heavily winged...


Both plates are cut of.
The next step is to mark the edge. On this picture we can see the mark along the side that is at an exactly set distance from the underneath of the plate which is flat.
The plates are now ready for most makers favorite bit : Creating the archings.

Linings

The linings are strips of wood (I use spruce, but willow or lime is good too) that run all along the ribs at the "top" and the "bottom" of them - this is the area that we call seams because that is where the plates (the belly and the back) come to be glued to the ribs.

In fact the linings provide extra support to the ribs (to avoid tension and distortions) and also a bigger gluing surface for the seams.


The linings are partially set into the blocks, where with time they tend to lose their bent shape and could come unglued from the ribs (which could cause buzzes). It is not necessary to set them in at the top and bottom bouts as their natural tendency would press them closer to the ribs - if anything.

dimanche 19 février 2012

Trimming the ribs.

Once the ribs of the top and bottom bouts are glued, they need to be trimmed. We do so in such a way that the joint is inside the "C" where they are the least visible.

Now we only need to fit and glue some linings and the rib structure will be left on the side until it comes time to glue it to the plates.

vendredi 20 janvier 2012

Finished scroll


Finishing of the head

 The head is getting there, just need some cleaning. I love that bit when I can fancy myself a bit of a perfectionist!
Gouges are good even for the finishing, especially when we are after leaving tool marks, like me, which really give character to a scroll. I also use scrapers (on the right) to erase some of the gouge marks. I never use sand paper in any part of my instruments, this would ruin the texture of the wood under the varnish and make the whole instrument bland.


mardi 17 janvier 2012

Scroll Carving - Second turn and eye.


Once I was happy with my first turn, making sure the symmetry was as good as my eye could tell, I carried out the carving of the second turn. At that point I find it usually necessary to improve the face view as I go along. This has to be done just by eye - templates can't help me there.
 There is then a lot of work to be done around the button of the head in order to prepare it for the back fluting and for it to be blended into the shape of the neck a little bit later on.
For me it is important to also start the fluting of the turns, the fluting of the front and back and the chamfer. It does produce a better scroll when these area are all worked on at once, but that means doing a lot of juggling and it's hard going for the brains !

In the meantime...

While I was totally immersed in making my best cello scroll yet, Douglas wasn't day dreaming. After the hard work of "thicknessing" the rib wood to sheets, came the time of bending them. The first job in that category is to shape the inside of the corner blocks (and some like me also likes shaping the top and bottom blocks at that point) and give them the gracious flow of the "C" bouts. A fair bit of the "look" of the body of the instrument is determined by that particular central part... And that is another place were the style of the maker can be strongly expressed. In this particular case, and for consistency, Douglas just followed my templates.

The "C" ribs are carefully bent one by one. They are usually all glued when each one of them has been bent and then the maker can call it quite a  day !
The next step is to trim them and to shape the outside of the corners. There are two reasons why the outside of the corners are not shaped at same time as the inside. The first reason is because when the "C" ribs are glued and clamped, a lot of pressure is applied on the blocks and we cannot think of having a pointy corner there that would break for sure. The other reason is that when the outside of the block is shaped, the "C" rib is shaped with it so the outside rib overlaps the inside and the joint is less visible.


At that point the body of the cello starts looking excitingly like what it will be finished... with a bit of imagination... When the rib structure and the head and neck are finished, we can safely say that half of the instrument is completed. This is not quite it with us, but we can kind of see it coming.
Douglas likes bending all the "outside" ribs first and then glues them all at once. I would bend and glue as I go. We use a "bending iron" which goes up to 250ºc, although we seldom use that temperature. The rib wood is dampened and carefully bend hot to match the shape of the mould. This is a very tricky and fiddly job where time limit has to not come into consideration. Rushing the job could also result in breakage of the rib which would be a disaster when you think how long it takes to prepare it ! Finding the perfect balance between bending from the inside of the rib and then from the outside is what will bring it to marry the curves of the mould.